KONTAKT'S HIDDEN "MIDI LEARN" CONTROL AREA
KONTAKT TIPS & TRICKSFOUR FOR THREE
If you’ve been using Kontakt for a while then you probably already know that most knobs, sliders, and switches on the interface of an instrument, as well as within Kontakt’s Edit mode, can be connected to a real knob, slider, button, pad or switch on your MIDI keyboard or controller.
You can do this by:
1) Right clicking the parameter you want to control
2) Select “Learn MIDI CC# Automation”
3) Move a control on your MIDI device.

Right click the parameter you want to control and select “Learn MIDI CC# Automation”.
Once you’ve completed these steps you will see the on-screen control move as you move the control on your MIDI keyboard or controller.

In this example the keyboard’s Mod Wheel (MIDI CC1) has been tied to the Attack slider of the amplifier section.
In this example we’ve tied the keyboard’s Mod Wheel (MIDI CC1) to the Attack slider of the amplifier section.
While this is sometimes enough, it’s often the case that upon “MIDI Learning” one control, you will encounter two new issues:
First: You don’t need or want to use the full range of the control, however, Kontakt forces this behavior by default.
Put another way, if you only need to modify a control within a 10% range, this means you will have to limit the use of your MIDI control to 10% of its range, which can be difficult to accomplish with any accuracy.

In this image you can see that the "Wet" parameter of Kontakt's Chorus effect has a maximum setting +24 dB. This is far more level than one would probably ever want to use.
Why not give 100% of your MIDI control’s range to the 10% parameter range you actually need? We will get to that in a moment.
Here’s the solution:
In Kontakt’s browser click “Auto”. Here you can select the MIDI CC# of your controller.
If you’re unsure what the number is, just move the controller on your MIDI keyboard and note the red lightening bolt that appears. You will also see any controls already tied to that MIDI CC listed in the “assigned to” column.

Here you can select the MIDI CC# of your controller. If you’re unsure what the number is, just move the controller on your MIDI keyboard and note the red lightening bolt that appears.
Upon selecting the CC # under "MIDI CC" you will have the ability to define the range of the MIDI learned parameter in percentage values (in the "assigned to:" section at the bottom of Kontakt's page).
In this example we will leave the “From %” at 0 but change the "To %" from 100 to 30.

Set the parameter range in the lower portion of the "Auto" window, labeled "assigned to".
But here’s where problem two creeps in. As the "Return" parameter increases we get an unwanted level boost.
The solution is to also MIDI learn the “Dry” control to the Mod Wheel and then change the the “From %” field to 33 and the “To %” to 15.
This allows for both controls to move in opposite directions, with two different sets of ranges.
Of course you can season this to taste, or apply this technique to any number of controls or effects.

MIDI parameters can move from large values to smaller values by making the "From %" larger than the "To %".
If you checkout our Fluid Harmonics library, you’ll see that we’ve made this sort of thing very simple by not only offering the ability to link Wet/Dry controls (which means you only need to “MIDI Learn” one of the knobs), but we’ve scaled the controls so they will neither go over 0db, nor have any level dips as they move in opposite directions.
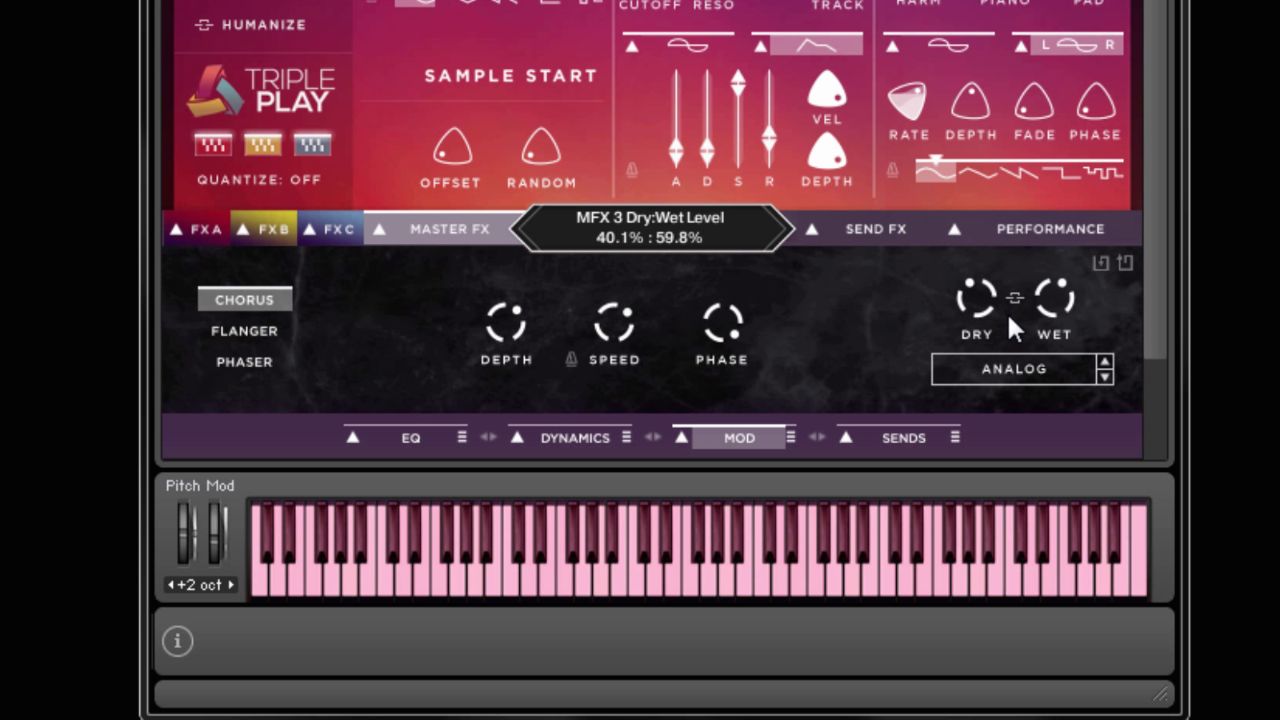
Notice the chain icon that links the Dry and Wet controls to one another - and moves them in opposite directions of one another.